Unveiling the Blueprint: Scale Your Web Infrastructure on AWS in Minutes


Table of contents

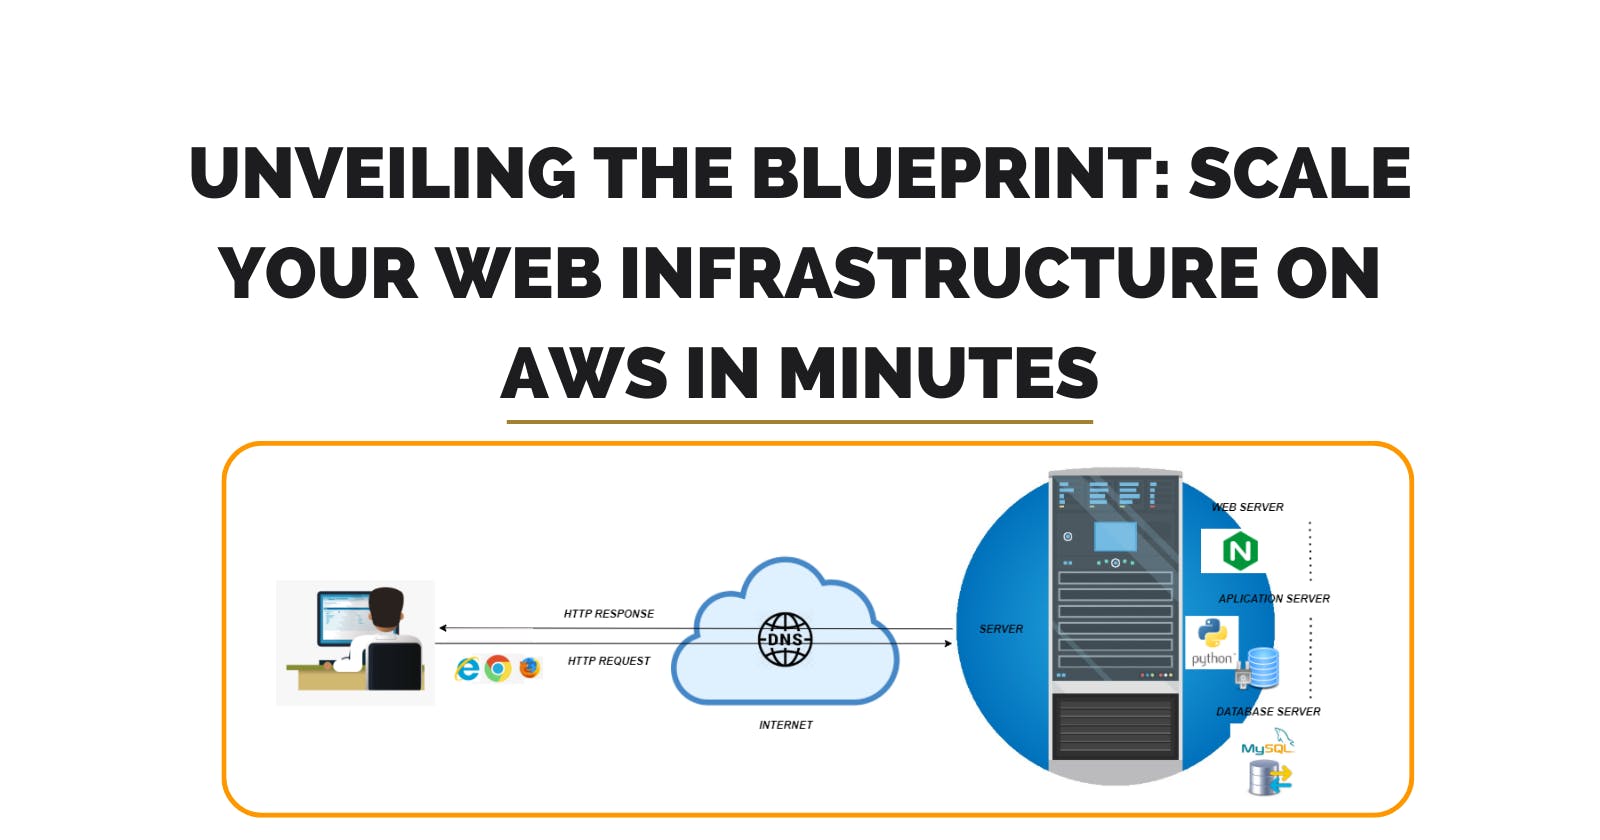
Ever dreamed of effortlessly scaling your web infrastructure to handle fluctuating traffic demands? Imagine a setup where your servers dynamically adjust to meet the needs of your users, all while maintaining impeccable performance. Intrigued?
Welcome to the gateway of exploring how to transform this dream into reality using the power of AWS. In this journey, we'll unravel the secrets of building a resilient and scalable web architecture, empowering you to conquer the ever-changing landscape of online traffic. So, buckle up as we embark on a thrilling expedition into the realm of cloud computing and automation.
We'll walk through the process of setting up a scalable web infrastructure on AWS, complete with a Virtual Private Cloud (VPC), public subnets, an autoscaling group, and an Application Load Balancer (ALB).
In this blog, you'll learn:
Create a VPC with cidr 10.10.0.0/16
Create three public subnets with 10.10.1.0/24 & 10.10.2.0/24 & 10.10.3.0/24
Create an autoscaling group using t2.micro instances. All instances should have apache installed on each instance with the ability to check any random IP address and be able to produce a test page. Ensure the autoscaling group is using the public subnets from #2.
The autoscaling min and max should be 2 and 5.
Create an Application Load Balancer to distribute traffic to the autoscaling group.
Create web server security group that allows inbound traffic from HTTP from your Application Load Balancer.
Create a load balancer security group that allows inbound traffic from HTTP from 0.0.0.0/0.
By the end of this guide, you'll have the knowledge and skills to build a scalable web infrastructure on AWS, ready to handle the demands of your growing web application. So let's dive in and get started!
Section 1:
Log into your AWS Management Console: Once at the console, let click and let create the VPC and subnets.
Create a VPC with cidr 10.10.0.0/16:
Check VPC and more
Name the VPC. I went with “weekProject7.”
In the IPV4 Type 10.10.0.0/16

4. Number of Availability zones, select three (3). This will give us us-east-1a, us-east-1b and us-east-c. keep in mind that your availability zone may be different. My region is US East (N. Virginia).
5. Public Subnets, select three (3) again and for private select zero (0).

6. Nat gateway select none; VPC endpoint select S3 Gateway
7. Once completed with the configurations click Create VPC, in the lower right hand corner. You should see the below screen, if so, you are now cooking with gasoline.

8. Now that our VPCs and Subnets are created. Returned back to the AWS console click on EC2 and then click on the Launch Template.
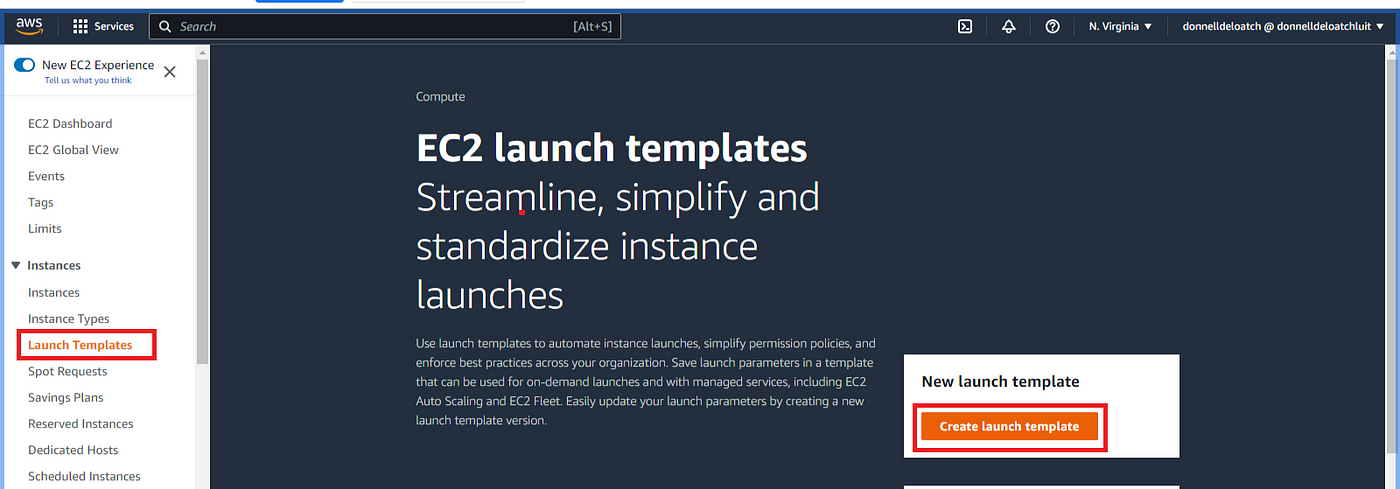
9. At the Launch template, name your template and check Auto Scaling guidance. I named my Launch template, “week7project.”

10. Select Amazon Linux (AWS)

11. Select Instance type t2.micro

12. For the key pair, I am going to use a key pair that I have used previous, which “gold-luit-kp.”

12. Network setting as always are important. It is what allows internet traffic to flow. We are going to allow and Allow SSH and HTTP
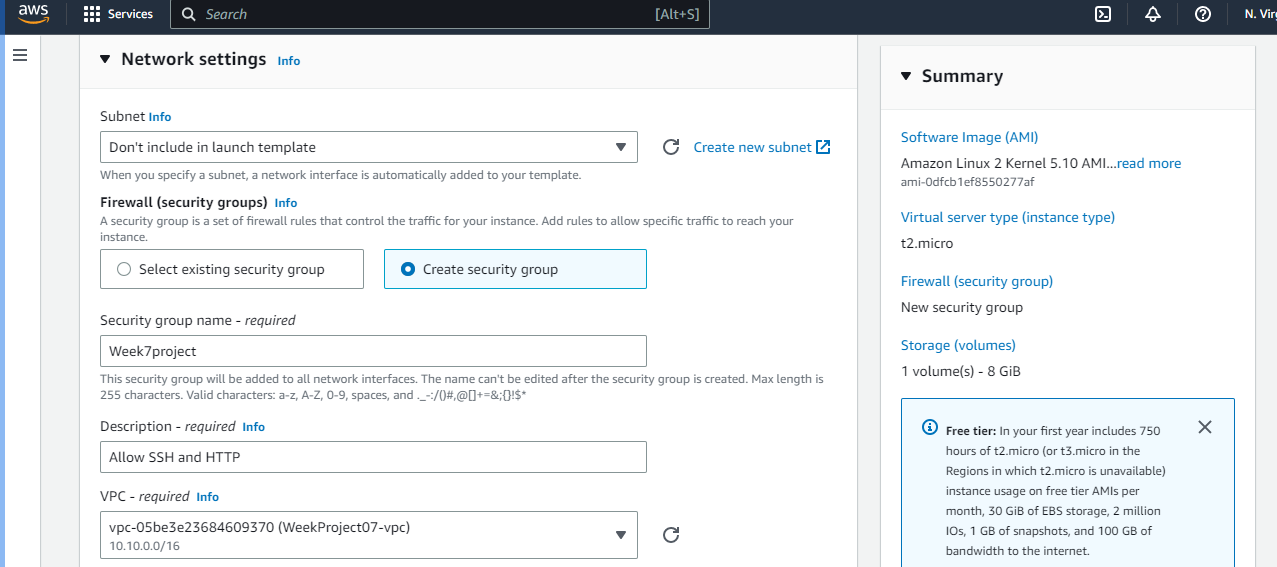
Under Advance details; User data enter the following
#! /bin/bash
yum update -y
yum install -y httpd
systemctl start httpd
systemctl enable httpd

Once at the end on the right hand side, click “create launch template.”

If done correct you will see the successfully created, which is always a good thing. Let’s continue, now we need to create our Autoscaling group and Load balancer.


Once completed, we can verify that our page will work by going to our instance that we created. Click on the instance and grab the IP address. upload the IP address into your web browser. If done correctly you will see the following.

Conclusion:
If you've found this guide helpful, show your love with a 💓. Building a scalable web infrastructure on AWS is key for success in the digital age. Subscribe to our newsletter and follow us for more insightful blogs and stay tuned for future tech wonders. Thank you for joining us in exploring the world of cloud services. Happy building!